

[No.12] Tilt It, Move It, Control It!!
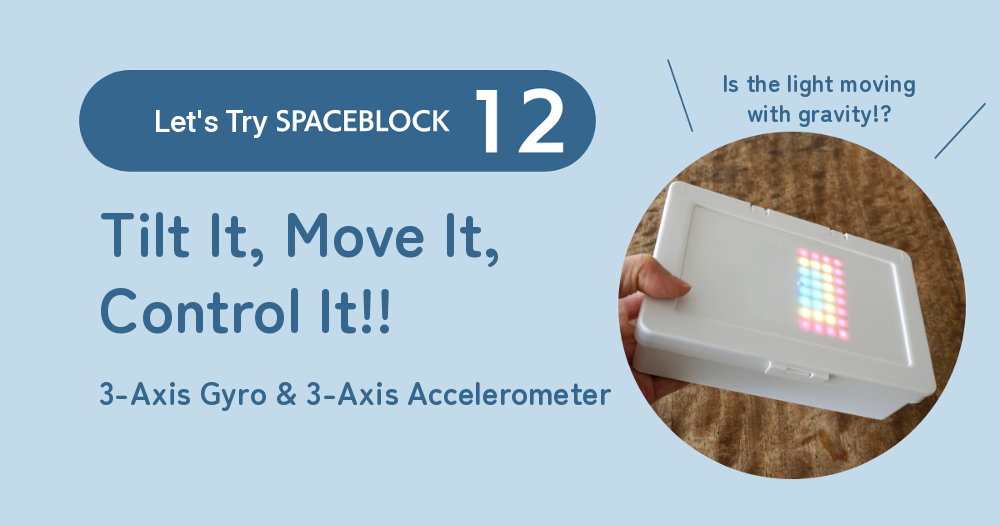
A toy magic wand flashes when you swing it, and a game character turns when you tilt the controller... Lots of things around us react to movement. This time, you'll use the "three-axis gyro and three-axis acceleration sensor module" to build an LED panel whose light moves when you tilt it.
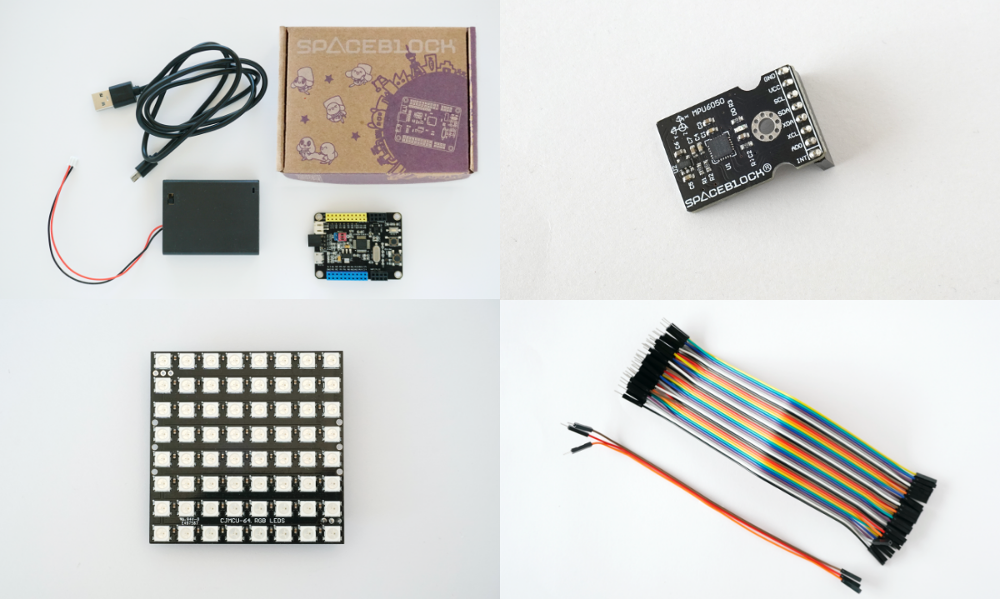
What You Need & Getting Ready
- SPACEBLOCK Standard Package [SPACEBLOCK board, USB cable, battery box]
- Three-axis gyro and three-axis acceleration sensor module (three-axis gyro sensor)
- 8×8 RGB LED matrix panel (LED panel)
- Jumper wires [3 pin header–pin socket wires]
- A computer for programming
Connect the Expansion Parts to SPACEBLOCK
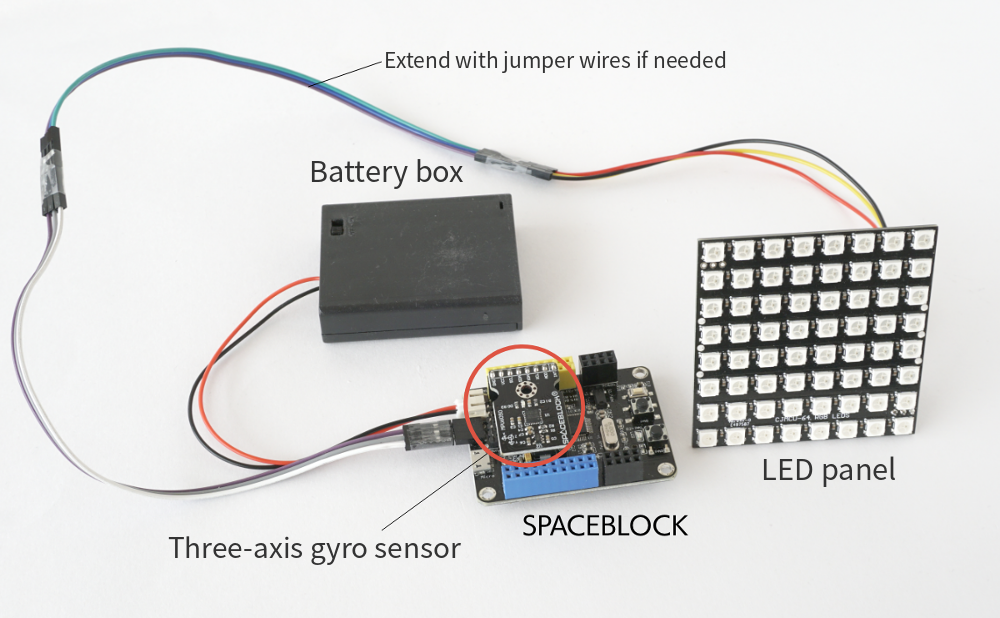
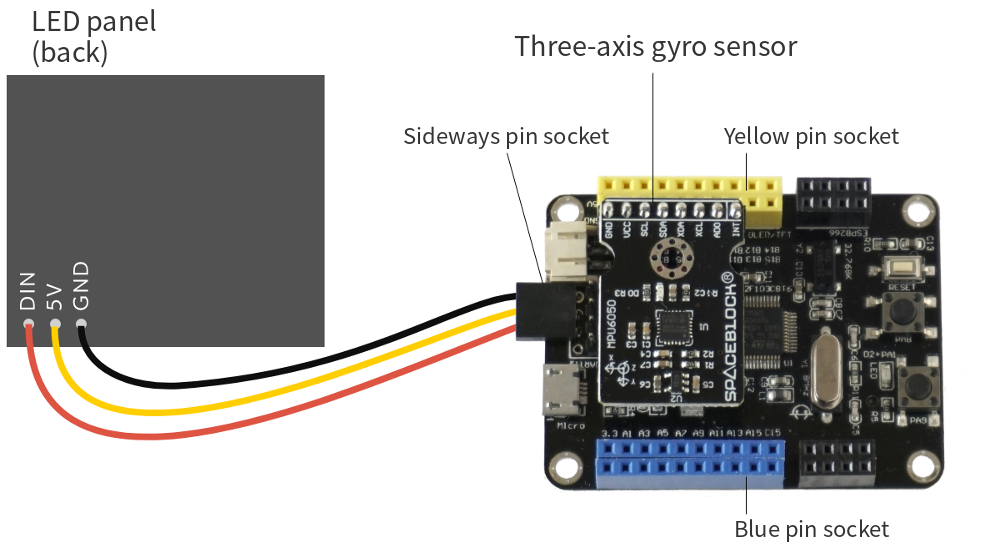
Check the next picture for the details. The three-axis gyro sensor plugs straight into a special pin header on the SPACEBLOCK board.
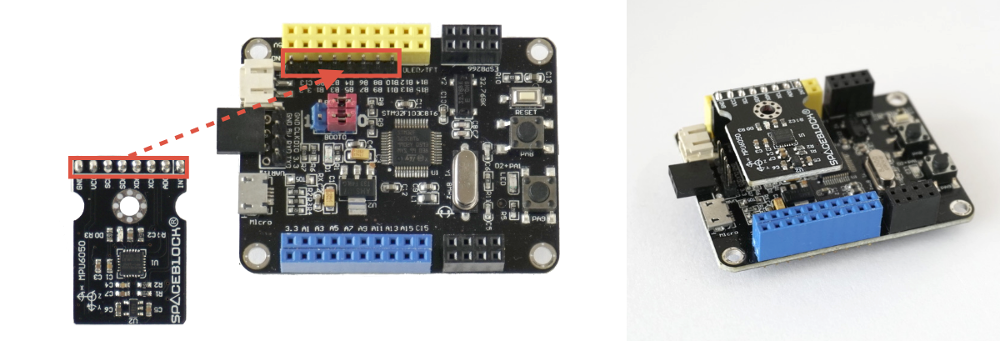
What Can a Three-Axis Gyro Sensor Do?
A three-axis gyro sensor can measure tilt angles and acceleration. This time we'll look at tilt angles. Acceleration is explained in detail in the next lesson, so be sure to check it out.
Three angles
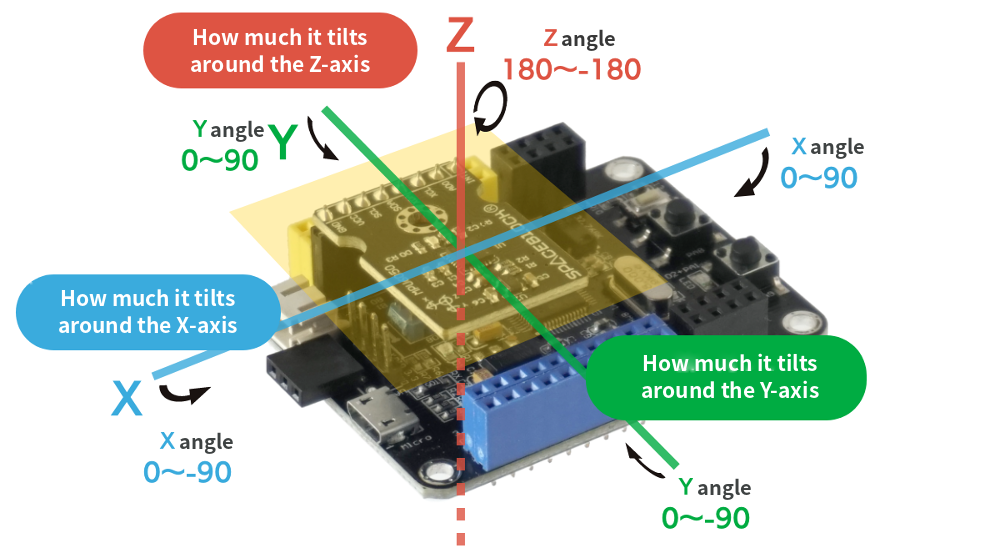
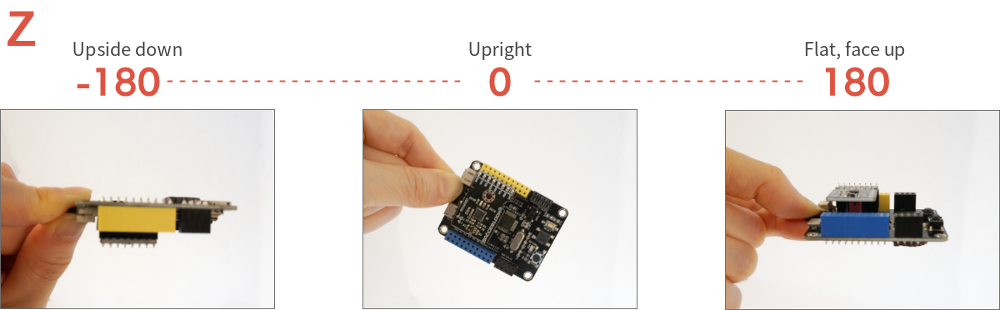
In a SPACEBLOCK program, the sensor measures how much the board is tilted around the X-axis, Y-axis and Z-axis, compared with lying flat on the ground.
Angle values
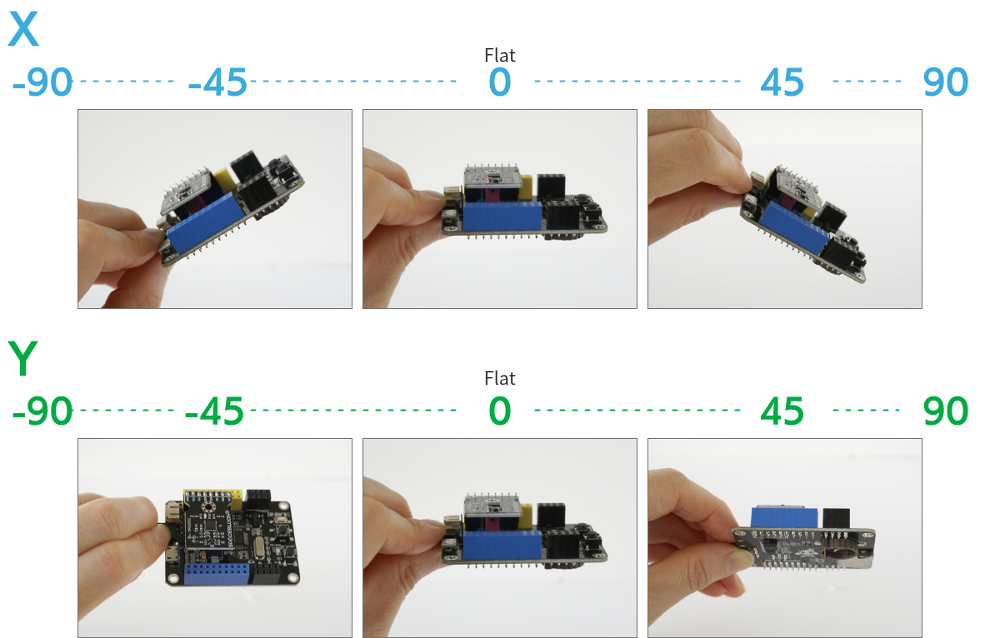
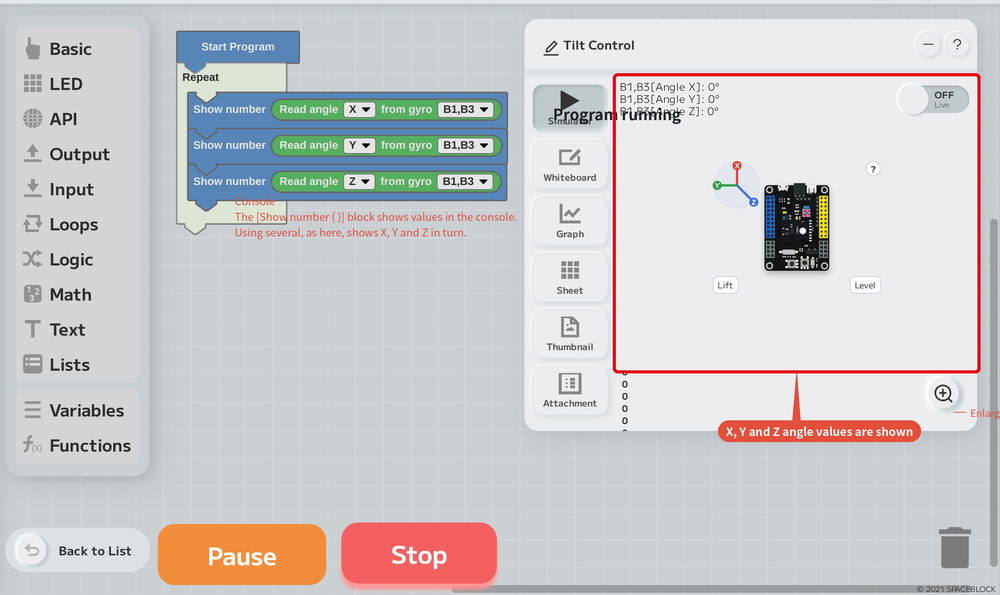
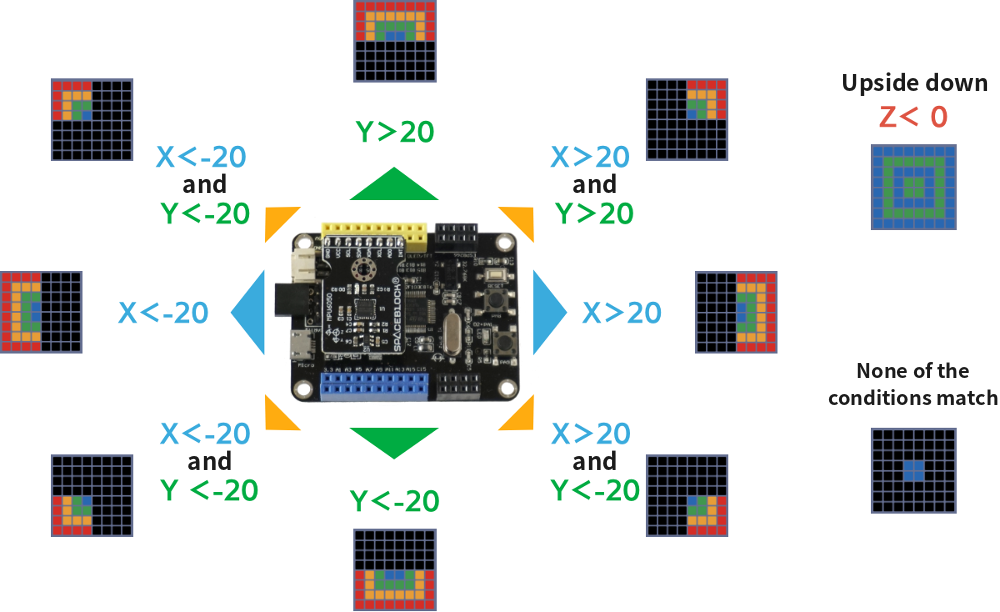
When the board lies flat with the USB connector on the left, the X angle and Y angle are 0. Tilt it to the right and the X angle becomes positive. Tilt it to the left and the X angle becomes negative. Tilt it away from you and the Y angle becomes positive. Tilt it toward you and the Y angle becomes negative.
Check the Three-Axis Gyro Sensor Values
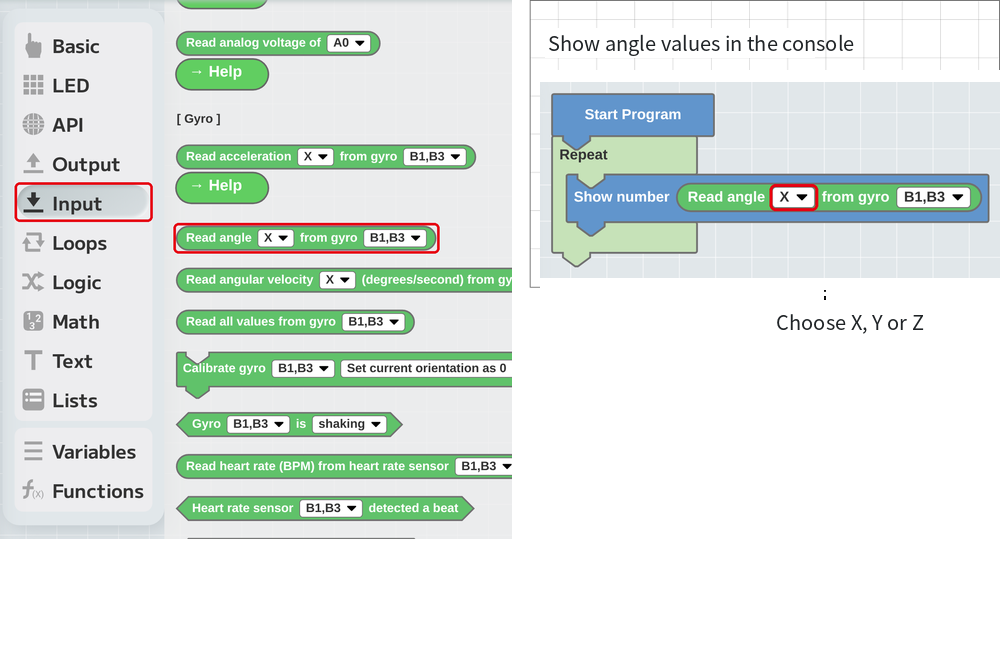
To see the X, Y and Z angle values at the same time, build the program shown in the next picture and run it. Tilt the SPACEBLOCK with the three-axis gyro sensor attached, and you'll see the values change moment by moment.
Change the LED Panel's Light with the X Angle!
Now let's make a program that changes the LED panel display depending on the three-axis gyro sensor values.
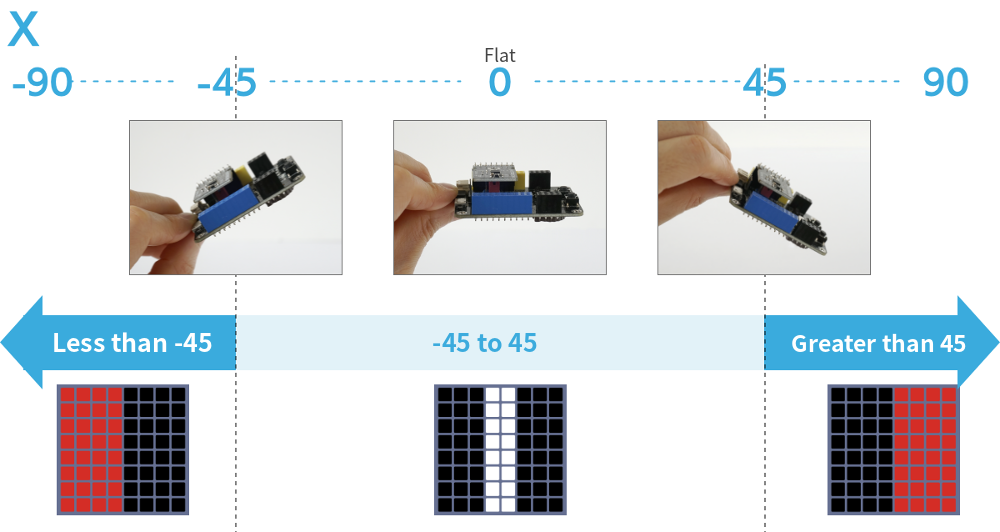
First, we'll use only the X angle. As shown in the next picture, you'll make a program that switches the LED display when the X angle goes above 45 degrees and when it goes below -45 degrees.
Create a variable
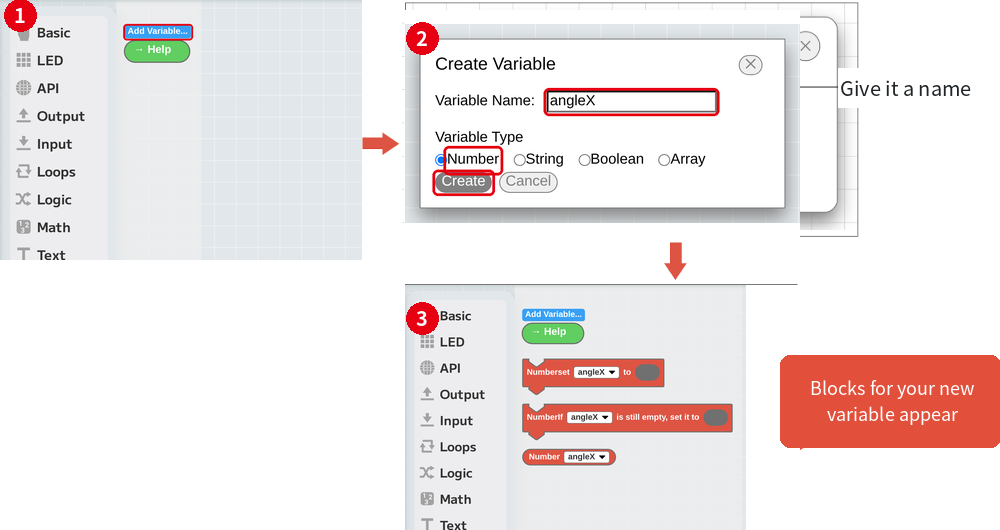
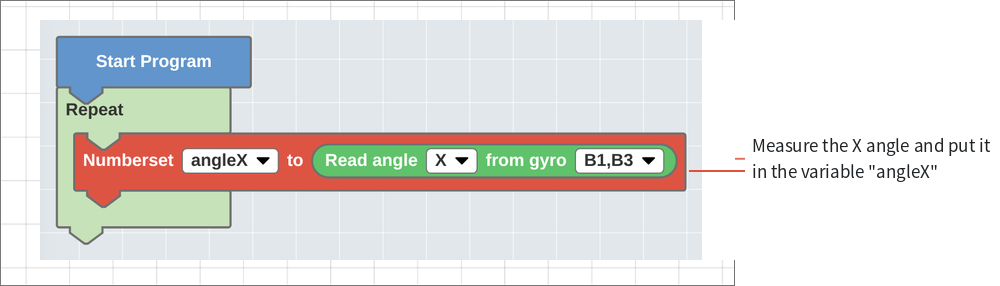
To make the X angle value easy to use in your program, create a "variable." A variable is a container that holds a value, and you can give it any name you like. Following the next picture, create a "Number" type variable named "angleX."
Put a [Number set (variable name) to ( )] block inside the [Repeat] block to set the X angle value into the variable "angleX."
Split the program by conditions
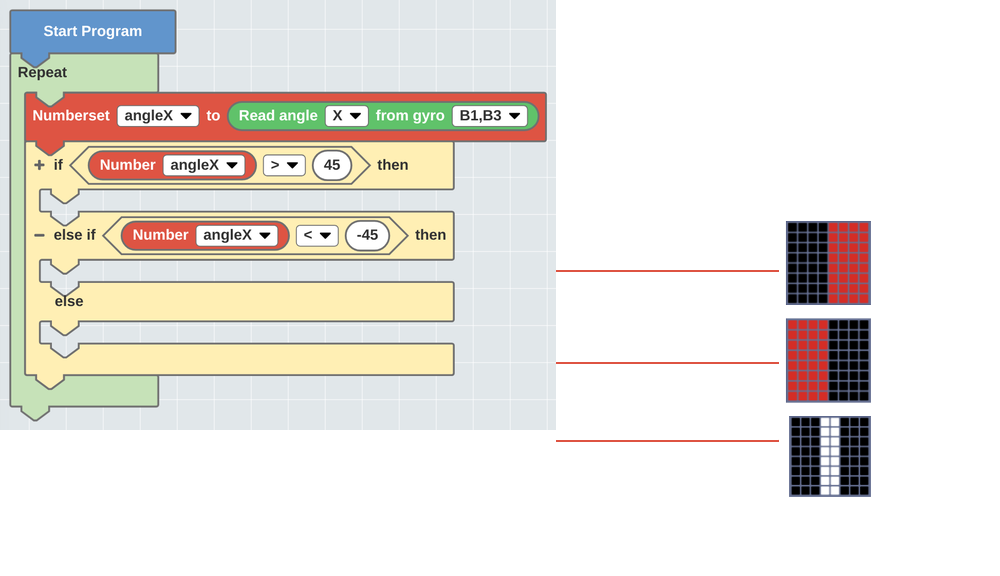
Next, make the program that switches the LED display. Use the [if ( ) then … else …] block and the [(0) (=) (0)] block to build a way to show the LED panel in 3 different ways depending on the X angle value.
Choose what the LED panel shows
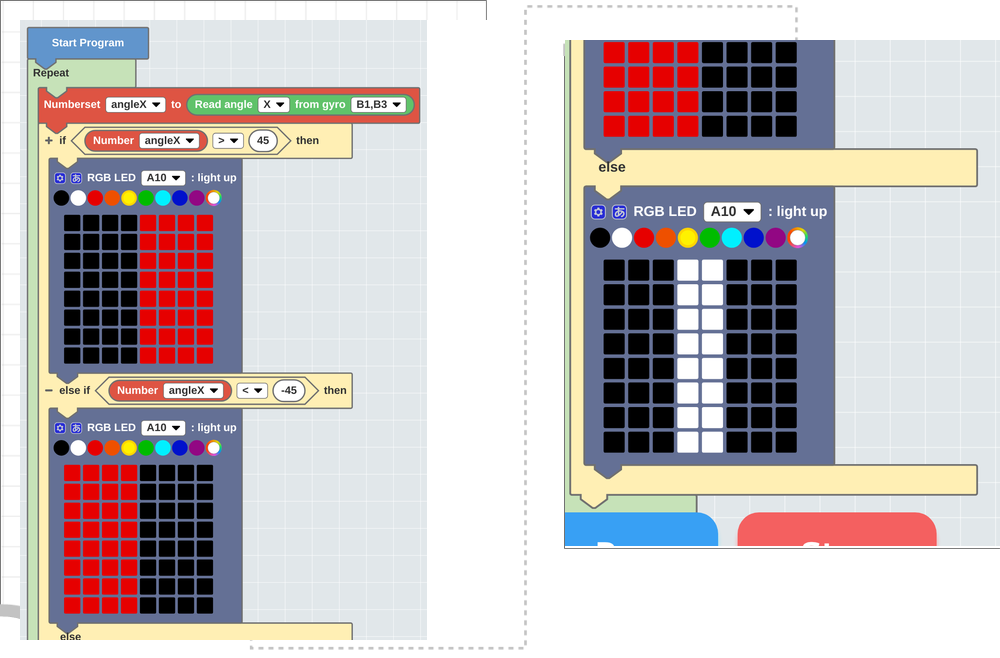
Put LED panel blocks inside the [if ( ) then … else …] block, and the program is finished as shown in the next picture.
Done!
When you run this program, the LED display switches with the tilt like this.
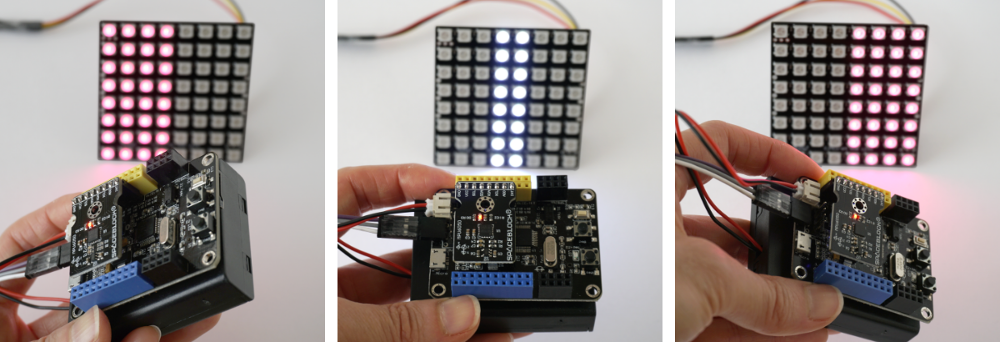
Hold the LED panel and SPACEBLOCK together, and it looks like the side you tilt toward is lighting up. Watch the video!
Change the LED Panel's Light with the Way You Tilt It!
Next, let's use not just the X angle but also the Y and Z angles, so the LED panel's light changes one after another as you tilt it. Give it a try!
As shown in the next picture, you'll split things into 10 cases: 8 tilt directions, upside down, and everything else, and change the LED panel's light for each. Design the LED patterns so the lights on the tilted side turn on.
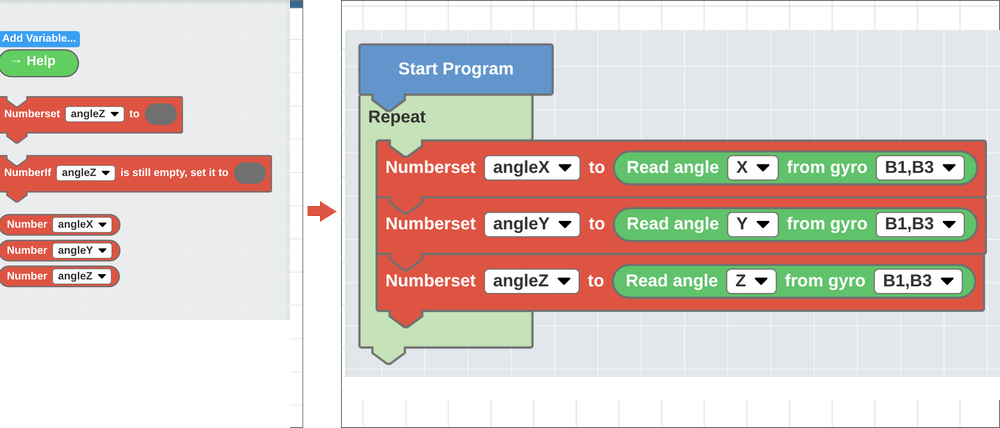
Create variables
Create 3 variables and name them "angleX," "angleY" and "angleZ." As shown in the next picture, put 3 [Number set (variable name) to ( )] blocks inside the [Repeat] block to set the angle values into the variables.
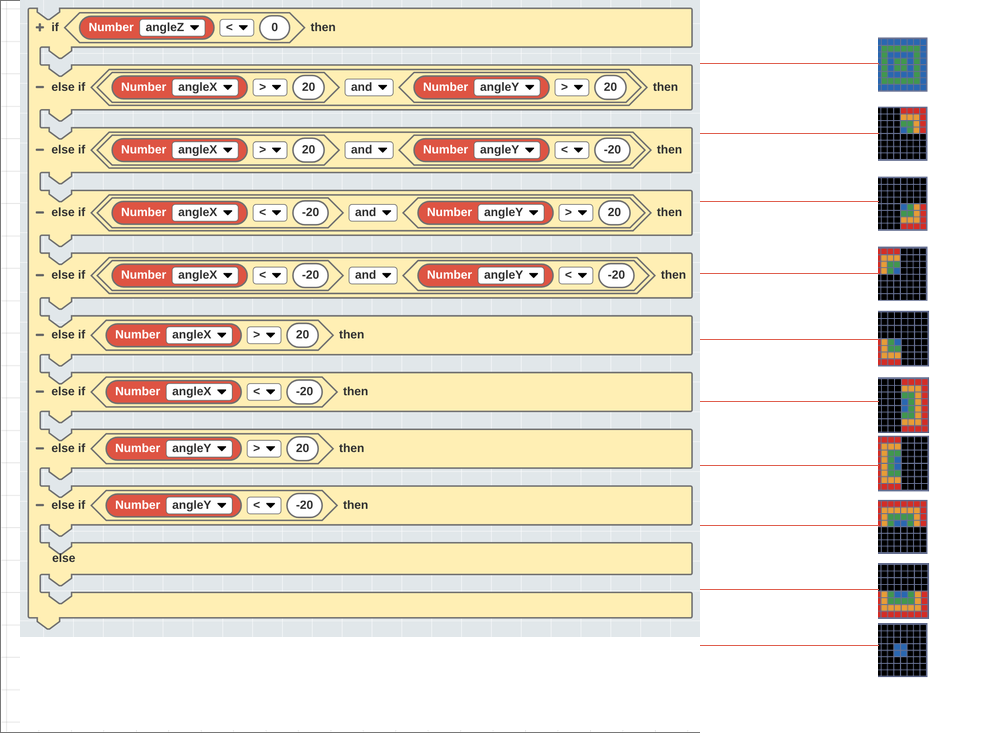
Split the program by conditions
Next, make the program that switches the LED display. As shown in the next picture, use the [if ( ) then … else …] block and the [(0) (=) (0)] block to build a way to branch into 10 cases. If you put an [( ) and ( )] block in the condition, you can check both the X angle and the Y angle at the same time.
Pick the [( ) and ( )] block from the "Logic" category and put it into the condition of the [if ( ) then … else …] block. Then put a comparison on each side of the [( ) and ( )] block.
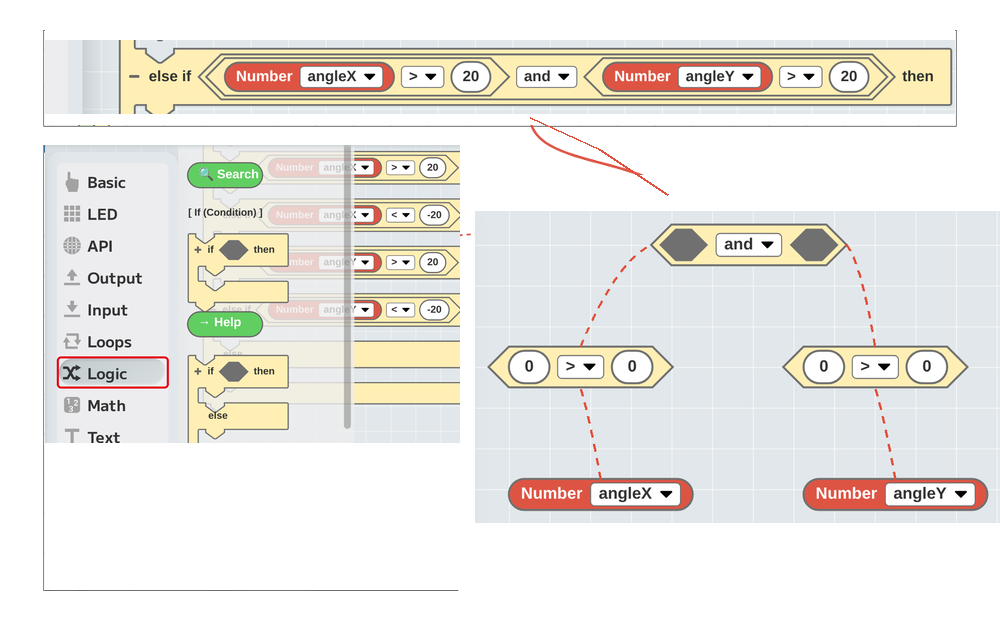
When the comparisons on both sides of "and" are "true," the whole condition is "true."
By the way, if you use the [( ) or ( )] block, the whole condition is "true" when either side of "or" is "true."
Choose what the LED panel shows
Put LED panel blocks inside the [if ( ) then … else …] block, and the program is finished. It's a very long program, so watch it in the video.
Done!
Let's run this program. Hold the LED panel and SPACEBLOCK together, and the light really seems to move with the tilt!
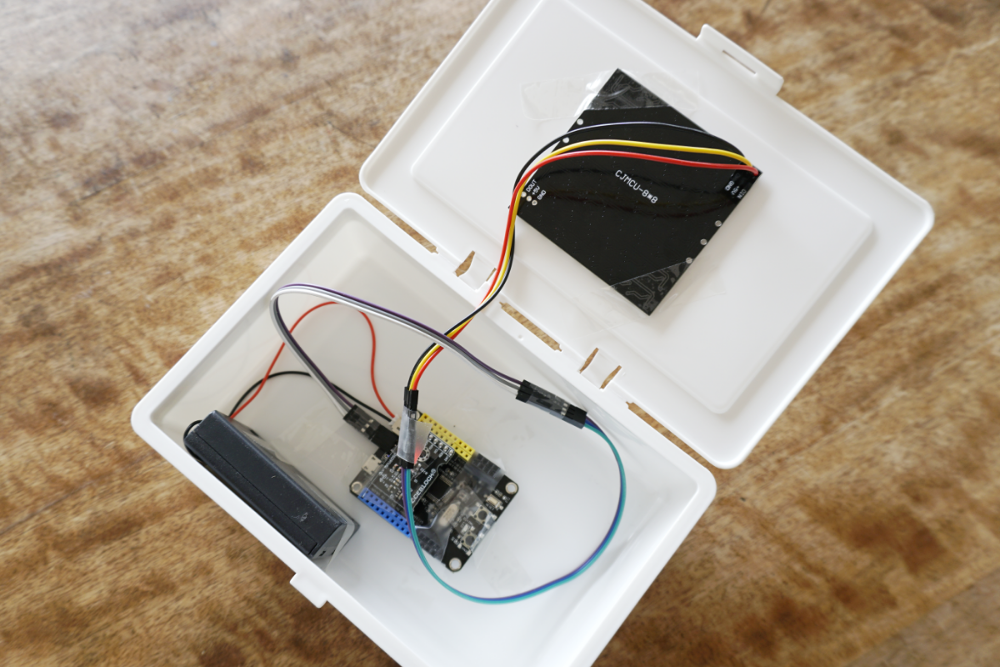
Now, just moving the box makes the lid seem to light up by itself.
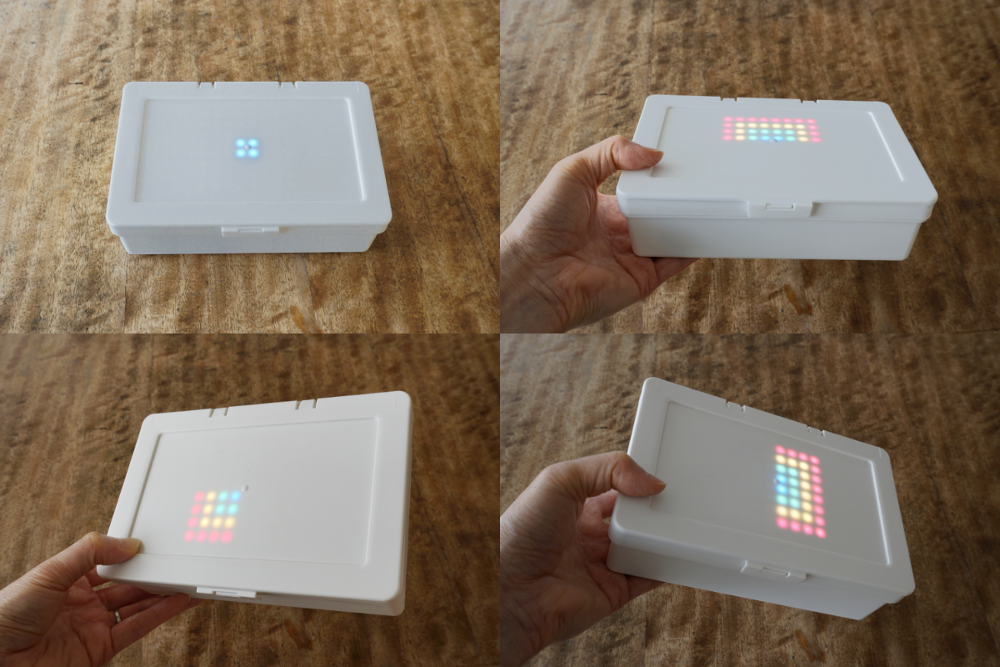
Watch the video!
By lining up the LED panel and the three-axis gyro sensor inside a box, we made a mysterious effect where the light seems to be pulled by gravity.
Like this, the three-axis gyro sensor is perfect for effects where something seems to move along with your own movements. This time we only used tilt, but you could do fun things with acceleration too. Think up lots of ideas of your own!!
